Notebook covers are one of the most useful and easily personalised gift ideas. I have sewn them before for teachers gifts.
Fabric can be chosen depending on a recipients hobbies, work & interests. When my animal-loving daughter wanted a cover for her homework journal this year, she was thrilled with cats (seen here in an Instagram picture).
For this tutorial I chose a colourful laminated cotton fabric for a recipe journal into which I've been writing our new favourite gluten-free recipes.
The difficulty in writing this tutorial is the huge variety of book/journal sizes, so it is written to show you how to sew a fabric cover for any size of notebook. My favourite part of sewing these covers is being able to add bookmarks and it is an easy way to use up shorter lengths of ribbons.
Firstly chose your fabric:
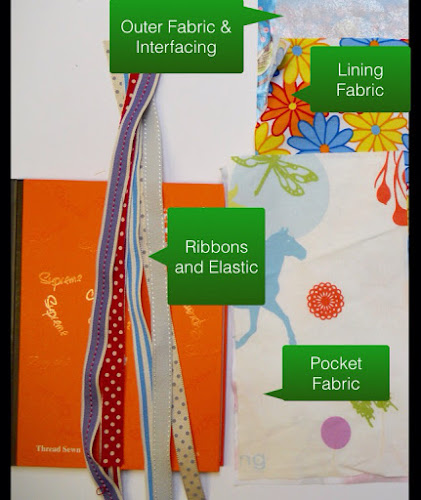
- Outer fabric (medium weight cotton, quilting cotton, laminated fabric, upholstery fabric,
- Lining fabric (this can be a lighter fabric & it won't be seen when the cover is in use)
- Pocket fabric (medium weight cotton, laminated cotton, interfaced light cotton)
- Interfacing (medium, the cover will look & function better if it has some structure)
- Ribbons for bookmarks (use up short lengths of ribbon I chose a selection striped and spotty ribbons from janemeans)
- Elastic to wrap around the book for closure
Secondly measure the book/notebook/journal that you want to cover.
- Height (from top to bottom and add 6cm to this - 6cm includes 2 x 1.5 seam allowances and .5 for turning fabric and .5 so cover is a little bigger than the book/journal)
- Width (from the edge of the front to the edge of the back. It is important to take this measurement when the book is closed to ensure the cover fits. Add 6cm to this measurement for above reasons.
- Front width only (And add half front width to full front width measurement - this is for the inside pocket and elastic)
- Cut 1 x Outer Fabric (Use Height & Width measurements with 6cm added as above).
- Cut 1 x Inner/Lining fabric (Exactly the same size as Outer Fabric piece).
- Cut 1 or 2 Interfacing pieces For the Outer Fabric and/or Inner Fabric depending on the weight of your fabric (same size as Outer Fabric above).
- Cut 2 x pocket fabric (Using Front Width Measurment above with half added for width of pocket and add 6cm, use height of Outer fabric as above. These pieces will be folded in half to form the pockets).
- Cut elastic (double the Front Width measurement above & add 6cm, may need less if your elastic is very stretchy).
- Cut a selection of ribbon lengths (eg 1 for a book/novel cover, 2-3 for a journal cover, 4+ for a recipe journal) 7cm longer than the Height of the book/journal.
Fourthly follow instructions and sew the cover:
- Add interfacing to the Outer Fabric and depending on fabric weight, to the pocket fabric and the Inner Fabric also.
- Fold the pocket pieces in half lengthwise and place on the Inner Fabric as in the picture, baste or pin together
- Place the ribbons in the top centre of the Inner Fabric and baste in place (sew with a long stitch)
- Sew the two ends of folded elastic to centre front edge of Outer Fabric.
- With right sides together place the Outer Fabric on top of the Inner Fabric (and pockets and ribbons). Ensure the ribbons and elastic are carefully tucked inside so they won't be caught in the stitching. Take your time with this step to ensure the tops of the Outer and Inner fabrics are put together and that the fronts also are placed together.
- Pin or baste inside the seam allowance all around, leaving an opening for turning. (You can turn through the cover at this stage, especially if you are unsure that pieces are correctly placed from Step 5).
- Sew all around using a 1.5cm seam allowance, and leaving a 7cm opening for turning. You may wish to reinforce the corners with an extra line of stitching.
- Trim the edges of the fabric closely and carefully, and cut across the corners.
- Turn the cover right way around by slowly and carefully pushing the cover through the opening.
- Carefully push through the corners, flatten out the cover and press.
- Hand stitch or top sew the opening closed.
- Insert book/journal cover into the pocket pieces and enjoy!
Pin It Now!


Mr Pedro went above and beyond their requirements to assist me with my loan which I used to expand my pharmacy business,They were friendly, professional, and absolute gems to work with.I will recommend anyone looking for loan to contact. pedroloanss@gmail.com.WhatsApp ..+ 1-863-231-0632.
ReplyDelete